
Do you ever find yourself strolling through the same old nursery, bored by the limited selection of Hibiscus on offer? Have you ever caught a glimpse of a particularly alluring Hibiscus in a fellow gardener’s backyard and thought to yourself, “I want that too!”. Whether it is a double-flowered variety or one with striking red veins, sometimes we just can’t resist owning these eye-catching plants. Or perhaps you simply want to save some money and multiply the plants you already have.
Whatever the reason may be, the solution to your problem lies in the art of propagation. By propagating new plants from cuttings, you can create a stunning collection of your own. And the best part? Propagating Hibiscus is a remarkably simple process.
In today’s blog post, I will be listing all the various methods for propagating your Hibiscus plant – both hardy and tropical along with some tricks to be successful on the very first attempt. So, keep on reading further to know how.
Advantages Of Propagating Hibiscus From Cuttings
Hibiscus propagation by cuttings is a simple and effective method to get new plants from an existing one. This technique is preferred by professionals as well as hobby gardeners for many good reasons.
First, propagating by sowing and raising seedlings involves combining the genes of the parent plants, which can result in different appearances and characteristics. So, it is quite possible that you can end up with a different variety of Hibiscus altogether! Also, this method takes a lot of time and requires specific care at different stages of growth.
Second, propagating by cuttings is a plant-based propagation method where the new plant is genetically identical to the mother plant. This is why it is a preferred method to propagate both perennials and shrubs.
Most importantly, propagating by cuttings is quite simple – You don’t need any special tools that aren’t available in most households and gardens.
So, whether you are a professional horticulturist or a newbie, propagating through cuttings is an excellent and easy way to create new plants.
Steps To Propagate Hibiscus From Cuttings
Step 1: Choose the right shoots
Select a healthy and robust shoot. It is best to choose a relatively new branch that is between 10 to 12 centimeters in length (pick the stem that has turned slightly brown).
Step 2: Remove flowers or leaves
Ideally, there should be no flowers or leaves on the shoot to keep evaporation to a minimum. Also, flowers take up a lot of nutrients and make it difficult for the new cuttings to develop roots. So, if there are any, remove them.
Step 3: Cut the shoot
Now using a sharp knife or pruning shears, cut the shoot at a 45-degree angle. If you want multiple cuttings, cut several shoots.
Step 4: Root the cuttings
You have two options for rooting here:
- Option 1: Water Rooting
Place the cuttings in a glass or bowl filled with water about 4 centimeters deep. Make sure that each cutting is placed separately.
Place the glass or bowl in a bright place but avoid direct sunlight (I usually place them near the window to receive indirect light).
Change the water every two days, using mineral water or tap water.
After around 25-30 days, the cuttings will develop roots that are about two to three centimeters long. Once the roots have grown to this length, plant the cuttings in a pot filled with potting mix. In the first few days, make sure the plant is not exposed to direct sunlight.
Below you can see some of my recent hibiscus cuttings that I successfully propagated in water.
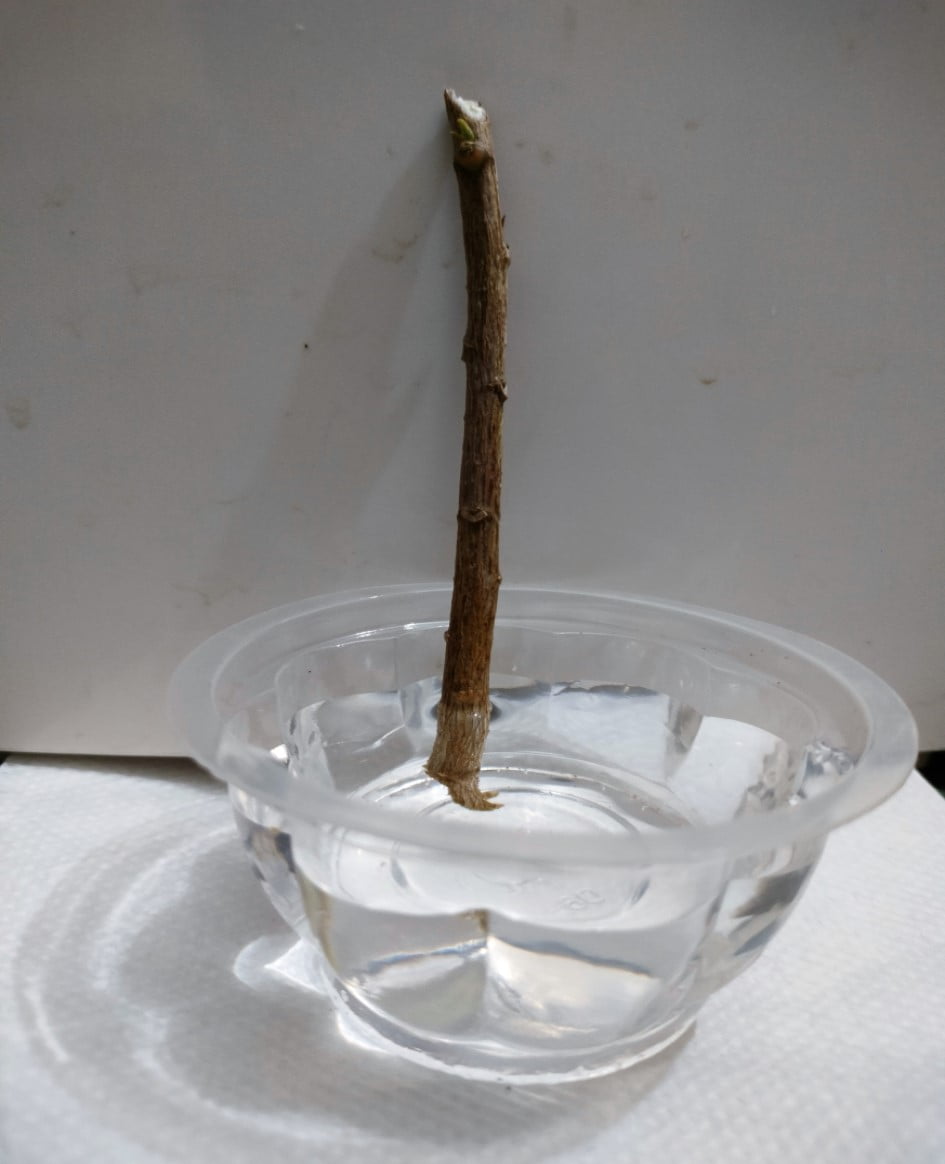
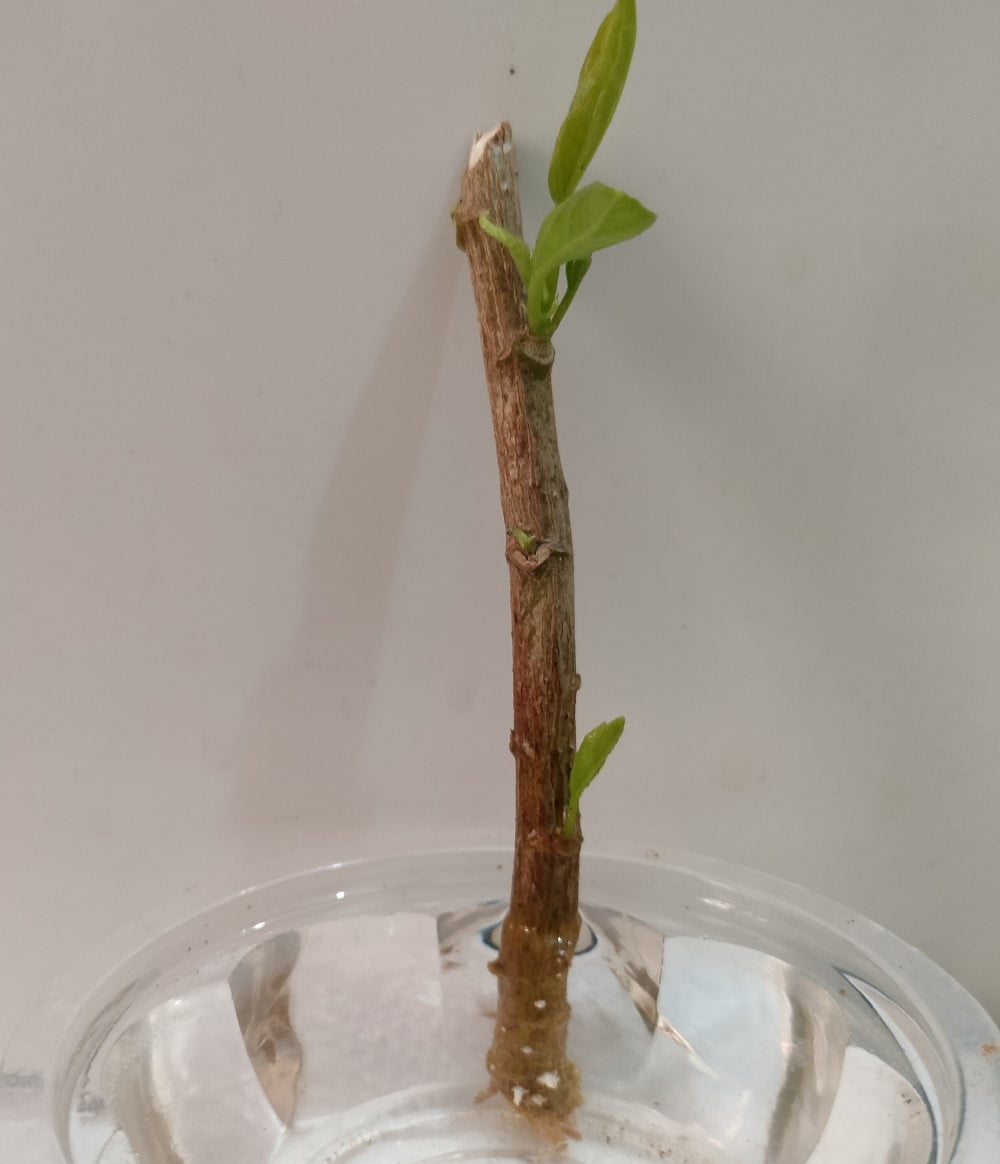
Important Note: It’s advisable not to wait until the roots grow too long before potting. Transplant once you notice around 2 centimeters of roots at the base.
- Option 2: Soil Rooting
Fill a small pot with loamy soil or follow the procedure mentioned in this article to prepare an ideal potting mix (Read article: How to prepare hibiscus soil).
Moisten the soil thoroughly. Insert the fresh cutting into the soil, about five centimeters deep. Cover the pot with a plastic bag, securing it with a rubber band or tape. This will help to keep the cutting humid.
Place the pot in a bright place, but avoid direct sunlight. After several weeks, the cuttings will develop roots. Remove the plastic bag once you notice true leaves (may take 5 weeks depending on the climate) and move the plant to a slightly sunnier place.
Important Note: If you are propagating the cuttings by placing them directly in the soil, then don’t forget to create an ideal growing climate for them.
Why?
Since these cuttings have not yet grown roots to provide themselves with the essential nutrients and water, the microclimate in which they grow plays a critical role in their survival.
The secret to keeping them from drying out is by providing high humidity, and there are several ways to achieve this.
The very first way is by placing them in an indoor greenhouse – in case you have one. Alternatively cut a large clear plastic bottle from the top and invert it over the cutting.
And if you do not have access to either of these, you can always use thin transparent film (cling film) and wrap it around the pot like a tent, using thin sticks to hold it in place.
But do not forget, these cuttings need ventilation as well! So, make sure you provide appropriate ventilation holes and frequently check on the cuttings. If it gets too damp, you run the risk of mold formation.
My advice: Propagating in water is a convenient option as it requires less space and does not need to be covered from the top. Moreover, the cutting is in water, so there is no need to provide extra humidity.
Propagating Hardy Hibiscus
While the basic principles of propagating hibiscus plants remain the same, the technique can differ slightly depending on the type of hibiscus you are propagating.
In the case of hardy hibiscus – a perennial that can tolerate cold temperatures, you can take several 4–6-inch cuttings from the stem, remove the leaves from the bottom half of the stem and dip the end in rooting hormone before planting it in a well-draining soil mix.
If you’re having a hard time finding the right cutting or you are unable to propagate successfully even after several attempts, there’s another method you can try here: Air layering.
This technique might sound a bit complicated, but on the contrary, it’s quite simple.
First, make a small cut in the stem of your hardy hibiscus and remove the top layer of the bark. Then, wrap the cut area with damp peat moss or coco peat. This will keep the stem moist and encourage root growth.
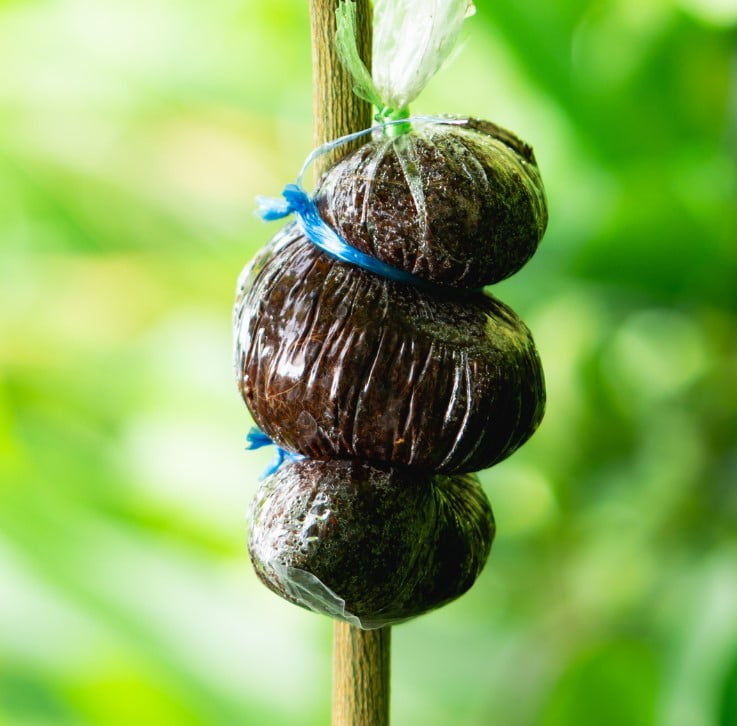
You’ll need to wait a while (minimum 35 days) for the roots to develop, but once they do, you can cut the stem below the new root system and plant it in a pot or in the ground.
By the way, air layering is a great method to propagate hardy hibiscus if all the shoots are too mature or too thick to be propagated from cuttings.
How To Ensure 100% Propagation Success?
When you’re trying to grow a new hibiscus plant from a cutting, it is naturally going to take some time before you see some true roots. To speed up the process, you can use a rooting hormone (this is what I normally use – Bonide Bontone) that contains Indole-3-butyric acid to stimulate root growth.
Another option is to make a homemade root stimulant from aloe vera leaves extract. Simply cut the leaves of aloe vera and dip the cutting inside the thick gel before placing it under the soil.
Ideal Time For Propagation
The ideal time for this process largely depends on where you live. For instance, if you’re a Floridian, the best month to propagate hibiscus through cuttings is April. On the other hand, if you reside in New Jersey, North Carolina, or Pennsylvania, the month of June is your ideal time to get started.
In short, to ensure successful propagation of cuttings, it is crucial to maintain a temperature range between 20°C and 32°C.
For a detailed guide, you can refer to the article “Best time to plant hibiscus” which highlights the ideal planting time based on USDA zones.
Cutting Technique
Now, to properly cut and pot these cuttings: First, make sure to use a sharp knife to prevent crushing the stem. The cut should be made at an angle (preferably 45 degrees) and on a healthy disease-free plant.
Also, before cutting – look for the shoots with few leaves and no flowers. And if the leaves are too big, feel free to remove them all entirely.
The length of the cutting depends on the maturity and the variety of hibiscus you are propagating. But as a general guideline, you can stick to the measurements of a standard HB pencil.
Also make sure the cutting has at least one internode, and remove every leaf from the part that will go under the soil.
Lastly, keep in mind that your cuttings should not be too soft nor too woody, as this could hinder rooting success.
Good luck!


